
A Beginner's Guide to Willow Basketry
Note: This post is periodically updated to contain the most relevant information.
Last updated May 2026
WILLOW BASKETRY — WHERE TO BEGIN?
Beginning in 2018 Dan started to teach himself how to weave with willow exclusively through books and online resources, eventually pursing in-person learning in 2022. He’s well suited to learn in such a remote way, but the approach hasn’t been without its challenges. The journey to figure out how to best grow, harvest, dry, re-hydrate, mellow and weave is still very much unfolding for Dan, but over the past few years he’s figured out quite a lot.
There are many access points to explore within willow weaving, but the following breaks down the process from plant to final product in order to give you the full picture. This story chronicles Dan’s personal experience as a beginner, which hopefully will inspire your own unique exploration.

1: The growth potential of a first year willow plant, shown in the fall.
2. Cuttings taken from coppicing that will be used to create new plants.
3 & 4: Harvesting and transporting rods to be processed before drying down for weaving.
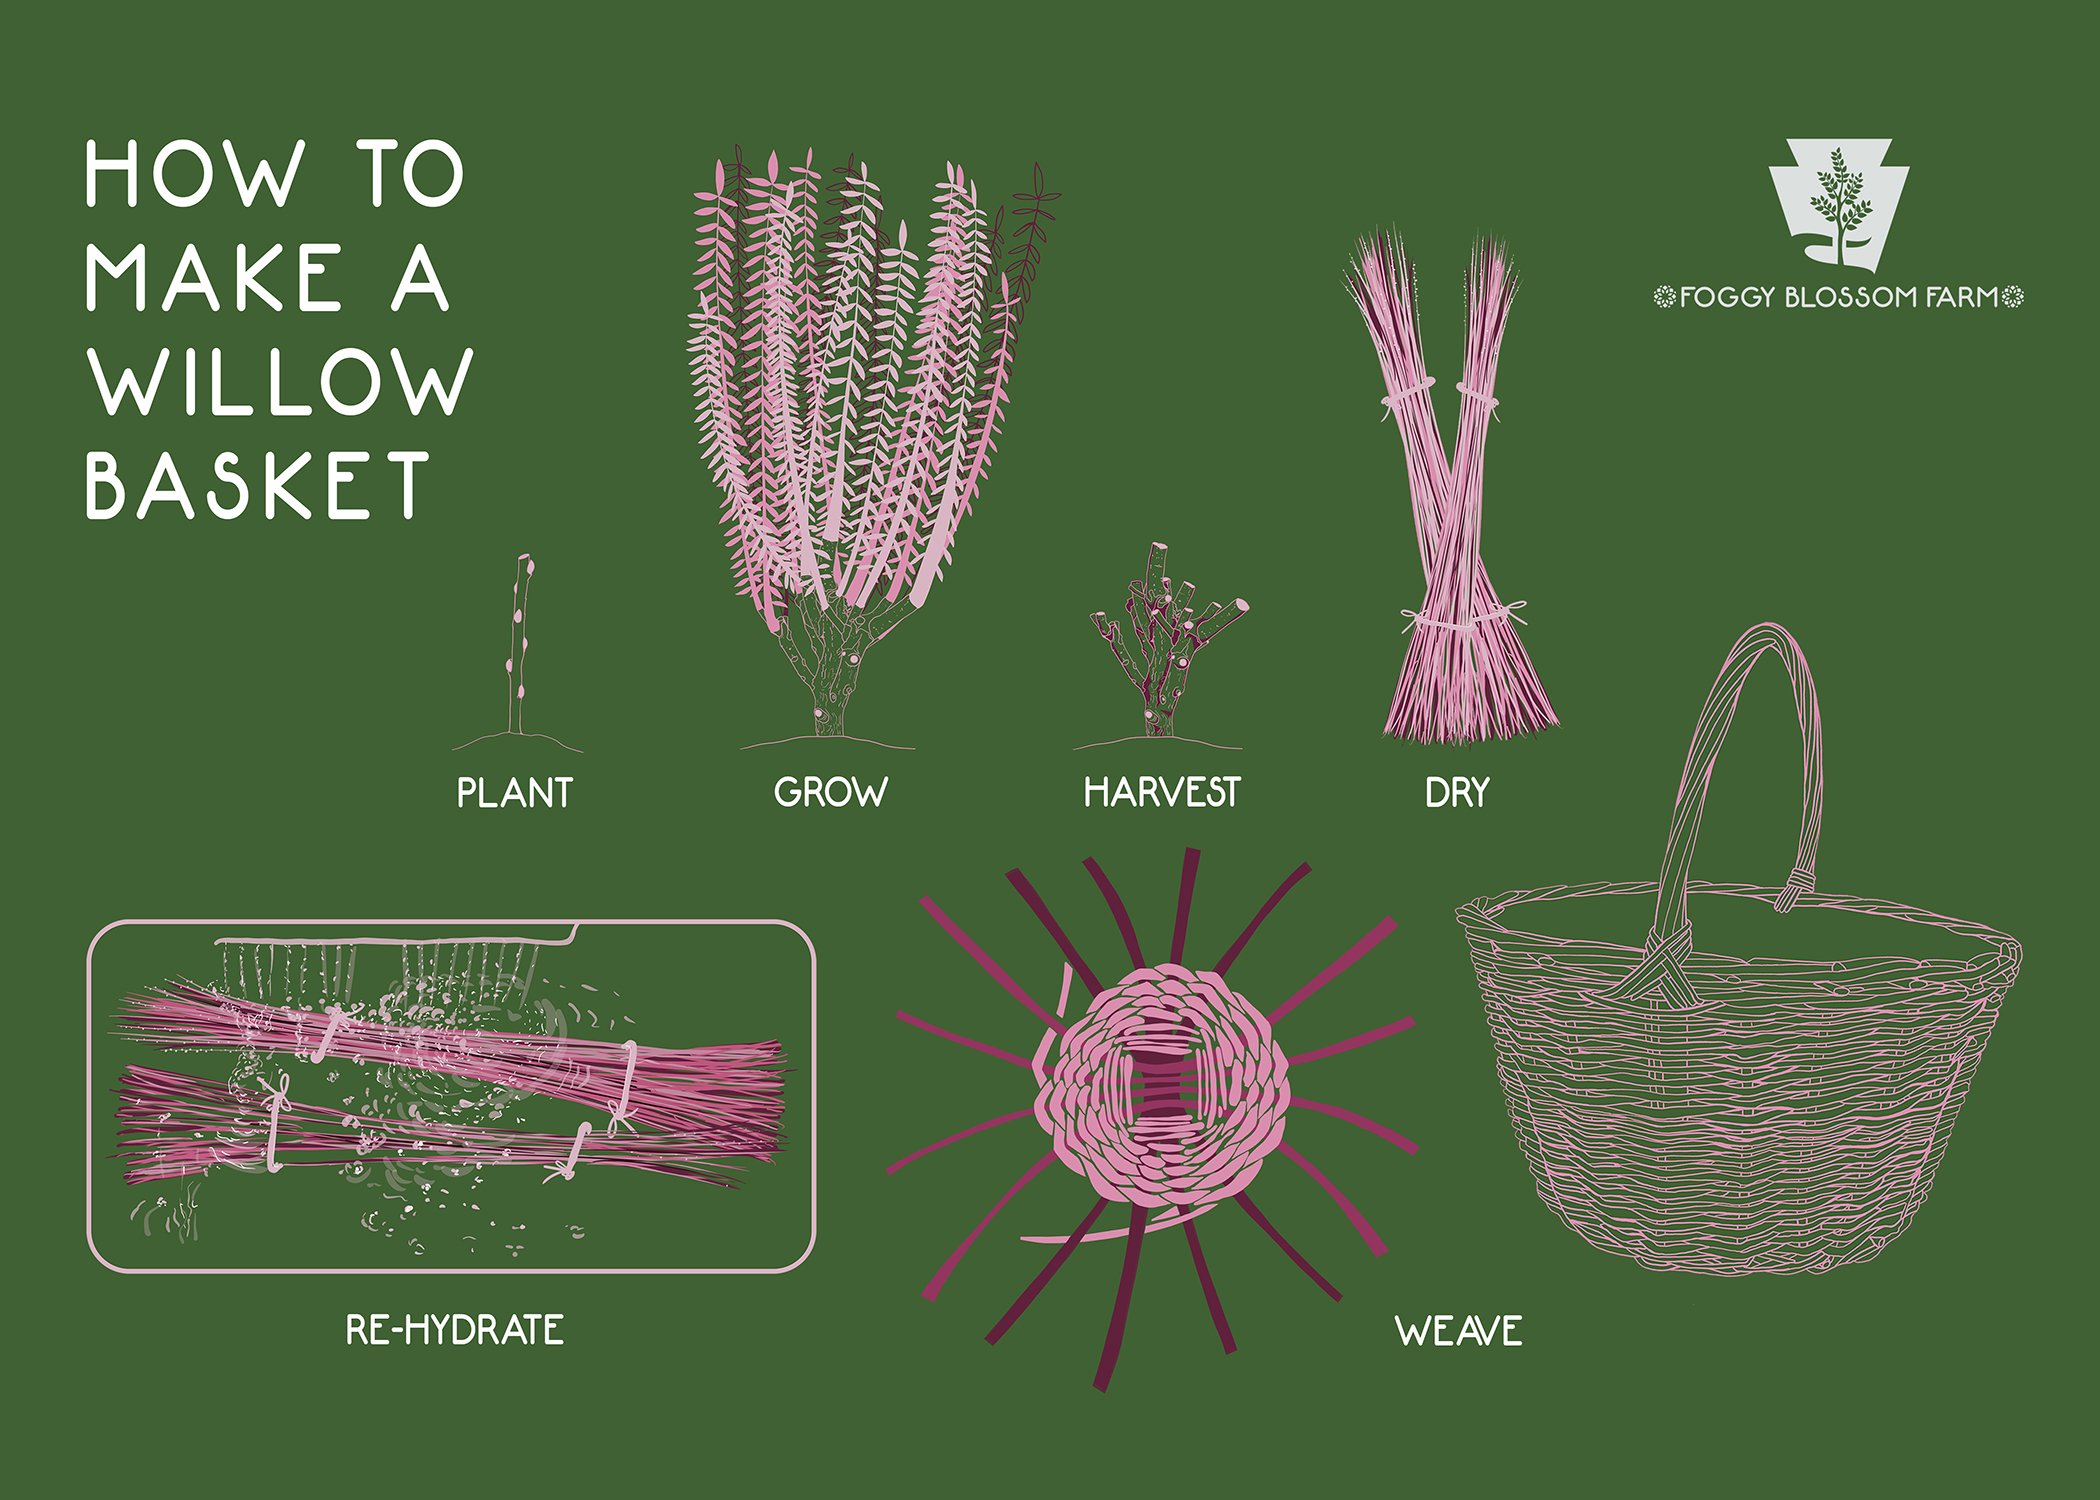
PLANTING, GROWING, HARVESTING and DRYING

Willow cuttings, ready to plant.
When it comes to willow most people think of tall, weeping trees, or fuzzy gray catkins, but the process of raising the plant exclusively for basketry is a process that follows a seasonal cycle centered on coppicing.
Willow coppicing is the process of pruning a plant to the ground during dormancy for the purpose of harvesting rods for weaving, or for obtaining cuttings to create new plants from. This process creates a “stool” (the remaining plant material above ground) and forces the root system below to become more robust, thus yielding a new abundance of growth the following season.
Cuttings taken from late winter coppicing are planted in the early spring, and each one will create a copy of its mother plant. Rods can grow quite substantially within the first year, and new growth appears as tall shoots that taper from wide at the base to thinner at the top. First year rods can be harvested and woven, but they likely won’t be of the highest quality.
It takes about 5 years of annual coppicing to produce the best weaving material. This is because throughout each successive year the stool that is left behind increases in diameter and produces more and more rods. The abundance of growth within the footprint of the plant, as well as the tight spacing between plants, trains the rods to become taller, straighter, of more equal thickness from butt to tip, and absent of branching as they all compete for sunlight.

Sorted and bundled rods set up to dry.

Dried bundles of willow showcasing a variety of natural bark hues, ready to be woven.
When you harvest fresh willow rods in the fall they are considered “green.”
You can weave with green willow, and some designs will work fine that way, but eventually the piece will dry and the integrity of the build may be compromised. Green willow creations will often loosen and become flimsy, impairing their ability to maintain the strength of the form.
The best approach to preparing willow for a weave that lasts is to sort and bundle the green willow by variety and length, and then leave it to dry completely for many months. Placing them in an upright position in a protected space with good airflow has worked great for us.
The drying process will shift the green willow towards a “semi-green state,” and eventually to a “brown” state. From there you are ready to re-hydrate and prepare the material for weaving. To date, Dan has only woven with bark-on willow, and you can find out more about this below.

Newly planted willow cuttings in our field, showing late spring growth and tight spacing (1 foot between each plant, 3 feet between each row).
Growing your own willow requires quite a lot of time and space, but is relatively easy to do, and there are hundreds of varieties to choose from. As an introduction, however, it may be easier to source material that is ready to weave with. Whichever route you’d like to explore, below are the growers that we have sourced from:
WILLOW SOURCES
Willow Cuttings: Willowbrook Basket Farm
Willow Cuttings: Vermont Willow Nursery
Dried Willow Ready for Weaving: Living Willow Farm (Ohio)

Willow stools that were coppiced in the fall, pictured with their new spring growth that will mature into rods for harvesting throughout the year.
TOOLS

Screwblock, Rapping Iron, Pruners, and a Bodkin.
The three tools you need to get started are listed below, and you may already have items on hand that could mimic their functions. There’s no need to invest in specific weaving tools as a beginner, but if you decide to dive deeper into the craft they will become necessary.
Rapping Iron - Tamps down the woven rods along the way to make the weave tighter so that when it dries it doesn’t loosen up as much.
Pruners - Cuts and trims willow rods to specific lengths.
Bodkin - Gently opens up space in order to guide rods through pre-existing portions of the weave.

Dan’s personal tool basket that he made in 2022 and takes everywhere.
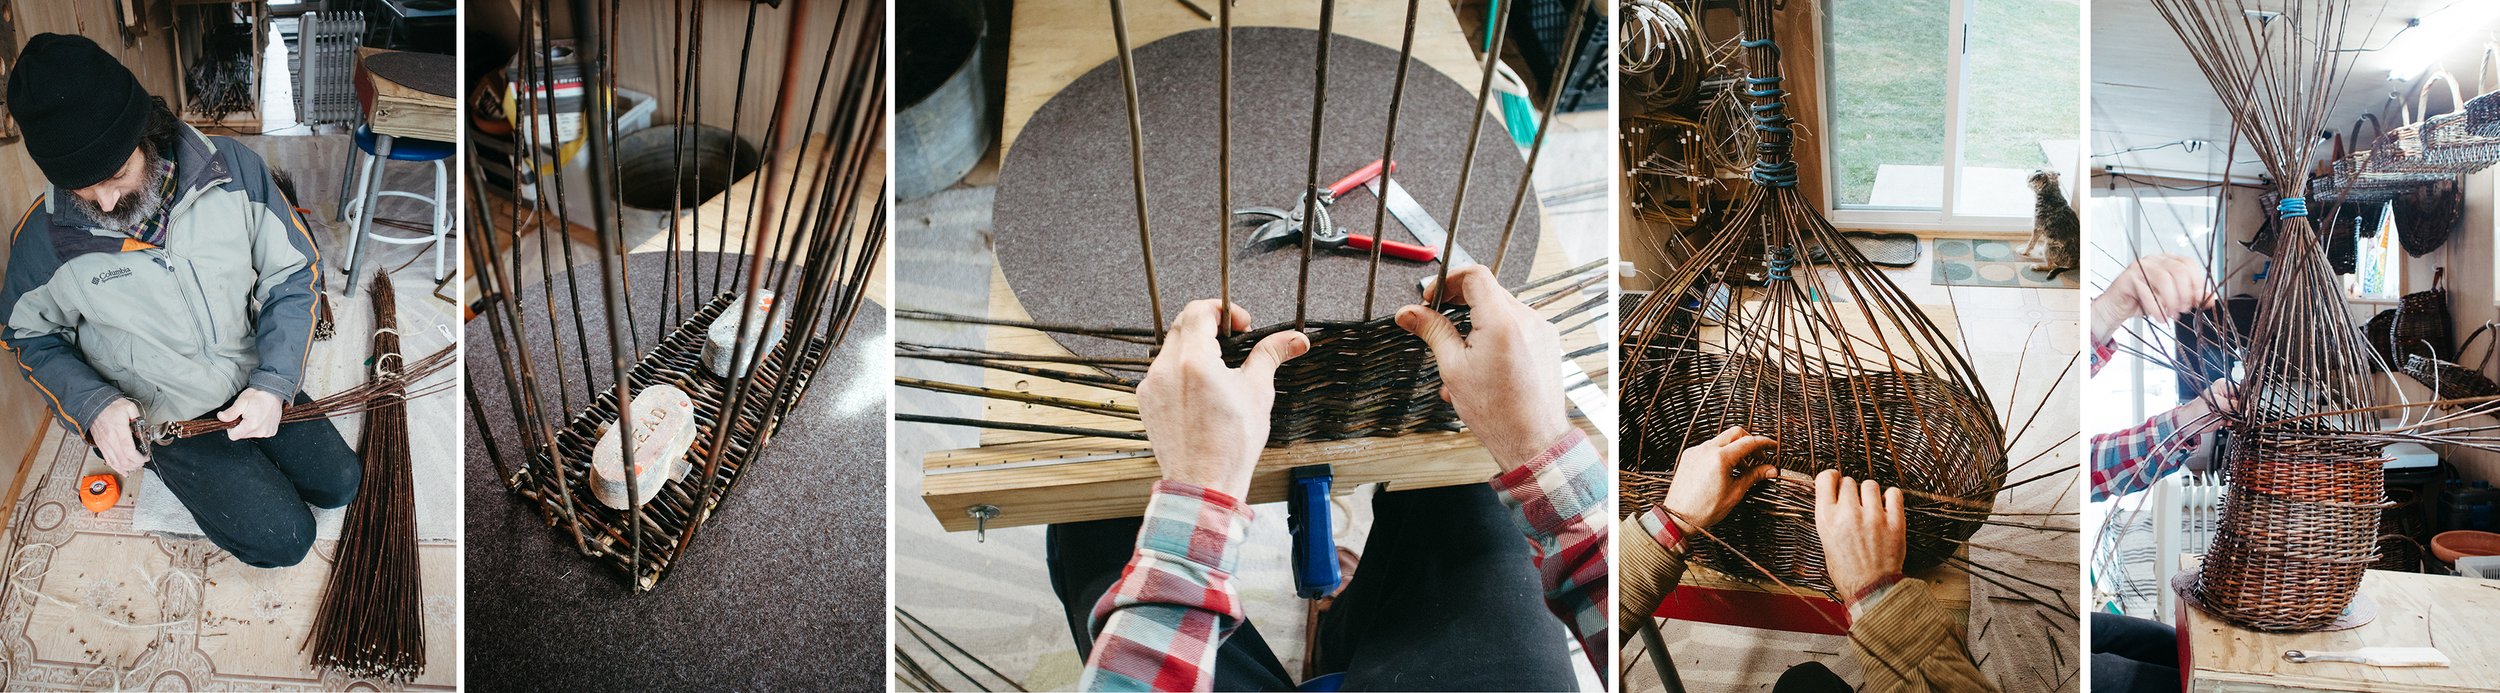
Using pruners, weights holding a base in place, using a screwblock to create a square-sided base, and two baskets in process with their upright weavers bundled into place.
Other materials that make the process easier:
Weights to keep the form in place
Dan uses a set of lead weights that were left in our shed by the previous owner, but anything small and heavy will do.
Tethering material to bundle upright rods while weaving the sides
Dan has experimented with using old electrical wire that was also left in our shed, and has moved on to using sections of old bicycle tubes.
Screwblock for making square sided bases and lids
Dan built this based on plans in Jonathan Ridgeon’s book (listed below), and fashioned it to his own custom specs.
Felt pad for cushioning the base so that the bark doesn’t rub off as you rotate the basket
We purchased a large piece of 20 mm felt from Etsy and cut it to fit Dan’s weaving table.
Ruler/Tape Measure for keeping everything even - symmetry is paramount!

Dan began by weaving on our kitchen floor (L) before creating his own studio and custom slanted table with removable legs (R).
It feels necessary to mention the importance of ergonomics when it comes to weaving.

An early iteration of Dan’s weaving table.
Traditionally people would sit on the floor to weave, often using a lapboard (a long, slanted board with one end on the ground and the other on your lap). Dan first began by working on our kitchen floor, but over time it became incredibly painful for him and he realized that he didn’t have any interest in weaving if he couldn’t sit in a chair. In the beginning we had no other space that was big enough to accommodate him, but eventually he built a studio specifically for his craft.
Since weaving can often take hours and hours of repetitive motions, Dan recommends finding a position that is sustainable for your body to inhabit over long periods of time. Comfort is king when it comes to the longevity of being able to weave.
RE-HYDRATING
To re-hydrate dried willow you’ll need enough water to fully submerge the rods, which often requires the use of weights to keep the bundles down. The water also needs to be warm enough to facilitate full saturation of the rods. Our current setup (detailed below) keeps the water around 70 degrees Fahrenheit, which creates a timeline of about 1 day of soaking per foot of material, followed by at least a day of mellowing.
One amazing trick is that once the willow is saturated you can freeze the rods until they’re ready to use and they’ll remain in a suspended, soaked state. A brief thaw will ready them for weaving.

An early soaking solution: submerging bundles in one of our tiny ponds.

Bundles of willow weighted down to soak.
Figuring out an ideal (and permanent) re-hydrating setup took Dan some time. He has tried using our small ponds, a large pipe that he filled with water and stood up in our shower, a hand-dug trough, and finally a livestock feeder with a filter/heater (pictured).
This setup ensures the water is always warm, never stagnant, and is also large enough to accommodate lots of bundles.
SOAKING SETUP SOURCES
Soaking Tank - Tractor Supply
Filter Heater for the Tank - Oase

Willow rods fully saturated and ready to be removed from the water.

HOW DO YOU KNOW WHEN THE WILLOW IS READY?
If you can achieve a 90 degree bend without the rod cracking, or the bark splitting at the butt, the material is ready.
Be diligent and check the rods every day, or every other day, to ensure you don’t go past the stage of perfect re-hydration. If it goes too far, the bark will start to slough off the rods while you weave them.
One sign to look for is the appearance of small white blobs across the surface of the rods, which indicate full saturation within.
However you deem the material ready, the next step is to move it from the water to a mellowing situation.
MELLOWING

Rinsing the bundles after removing them from the tank, and letting them air dry completely.
We like to describe mellowing by comparing it to the act of leaving a piece of meat to rest after cooking in order to redistribute the juices. Letting the willow sit will move it from a super soaked state to a more “semi-green” state.
After Dan rinses the rods, he keeps the bundles upright until they are completely dry. Sometimes a fan is used to expedite the process, and then rolls them in a tarp. If weaving in the near future (several days) he will leave them wrapped in the tarp until ready to use, but if he wants to weave much later he will transfer the mellowed material (still in the tarp) to our deep chest freezer.
As you are developing your own mellowing method, be sure to check the rods a few times throughout the process to ensure they’re not too wet or too dry. Mellowing is an important step, and the last one before weaving.

Note: Willow should be in tarps when frozen, but are not here for the sake of the photo.
THE 3 STAGES OF BARK-ON WILLOW
GREEN
Freshly harvested, living rods taken during coppicing
Can be woven, bundled and dried, used for planting as cuttings, or used to create living willow structures such as fences
SEMI-GREEN
Partially dried, halfway between green and brown in terms of moisture content
Primarily used for weaving
The stage that brown willow mimics after re-hydration
BROWN
Fully dried, brittle rods
Can be stored for long periods of time in a protected, dry environment with good airflow
Can be re-hydrated and used for weaving
WEAVING INSTRUCTION & INSPIRATION
Now that you know how willow weaving material is created and prepared, there are many ways to pursue your first weaving project.
Dan has rounded up his favorite resources that got him to where he is today, all of which were self-guided. If teaching yourself doesn’t resonate with your learning style, there are many in-person and virtual workshops and classes to be found.

BOOKS
Willow Basketry: A How-to Guide by Jonathan Ridgeon
The Complete Book of Basketry Techniques by Sue Gabriel and Sally Goymer
Basketry: The Art of Willow Craft by Peter Juriga
Baskets with Corners by Steen H. Madsen
Zarzo Baskets and Trays by Ulla Misser
Coppice by Mark Krawczyk
Willows by Christopher Newsholme
MAKERS & GROWERS
Willow Vale Farm (NY)
Willow Ridge Baskets (IA)
Living Willow Farm (OH)
*Blithfield Willowcraft (UK)
Dunbar Gardens (WA)
*Coyote Willow School House (Pacific NW)
*Hannah Van Aelst (Ireland)
*The Branch Ranch (Canada)
Lakeshore Willows (Canada)
*Online classes available
CRAFT SCHOOLS
*Sanborn Mills Farm (NH)
*We have taught here
VIDEO
Green Willow Weaving With Nick Neddo - WildLife Series on YouTube
RESOURCES

A final note:
If all of this info is overwhelming, or you’ve gotten the impression that weaving is a bit too much to take on, know that you truly don’t need anything other than some bendy plant material to get started. Dan’s first baskets were made from blackberry canes and multiflora rose (he removed the thorns from both) that were already growing on our property, and it was enough to give him the feel of whether or not it was a craft he wanted to continue.